If you’re looking to set up a new WordPress site quickly and efficiently, Softaculous is your go-to tool. Softaculous is an auto-installer software available in cPanel and other hosting control panels, making WordPress installation a breeze. In this guide, we’ll walk you through the process of installing WordPress with Softaculous, ensuring that your new site is up and running in no time.
Why Use Softaculous for WordPress Installation?
Softaculous simplifies the WordPress installation process, eliminating the need for manual setup. Here are a few reasons why using Softaculous is beneficial for installing WordPress:
- Ease of Use: With Softaculous, you can install WordPress with just a few clicks.
- Automatic Updates: Softaculous can automatically update your WordPress installation to the latest version.
- Quick Installation: Save time with an installation process that typically takes less than 5 minutes.
- Customizable Settings: Softaculous allows you to configure various settings during installation.
Step-by-Step Guide to Installing WordPress with Softaculous

Step 1: Access Your cPanel
- Log in to your hosting account.
- Navigate to your cPanel dashboard.
Step 2: Open Softaculous
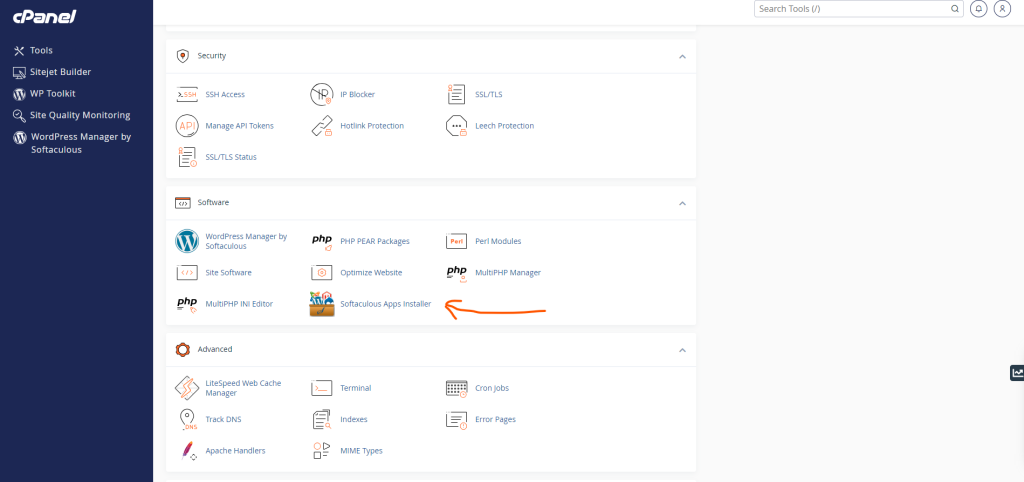
- In the cPanel dashboard, locate the “Softaculous Apps Installer” section.
- Click on the “Softaculous” icon to open the Softaculous interface.

Step 3: Select WordPress
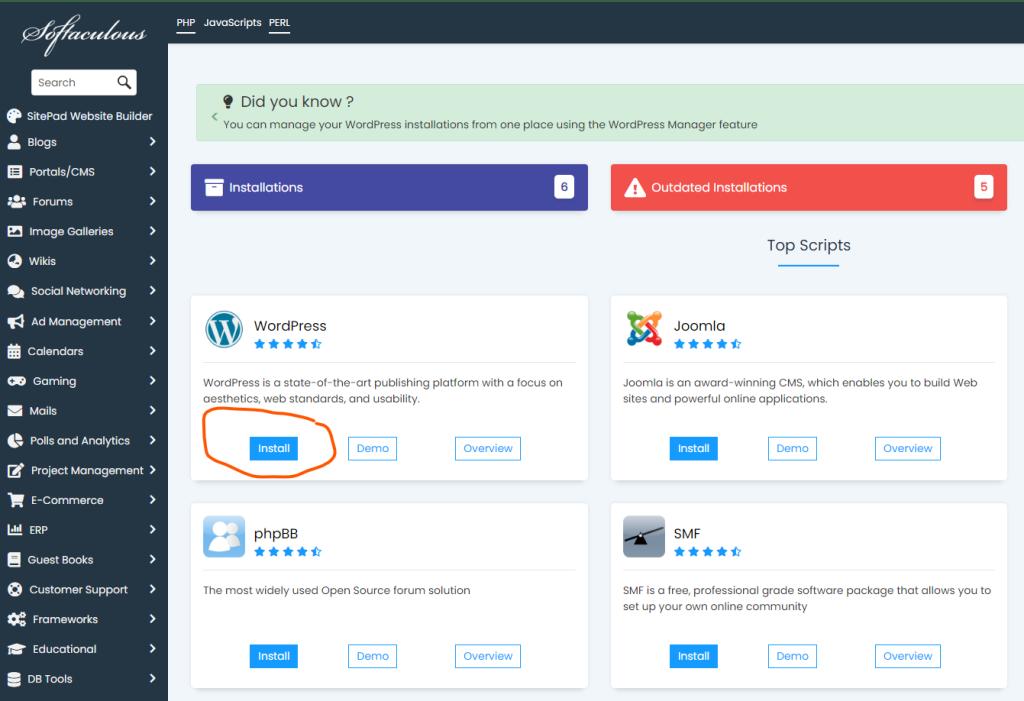
- In the Softaculous dashboard, find the “WordPress” icon under the “Blogs” section.
- Click on “WordPress” to proceed to the installation options for this process.
Step 4: Start the Installation Process
- Click the “Install Now” button to begin the WordPress installation.
Step 5: Configure Installation Settings
- Choose Protocol: Select the protocol for your site (HTTP or HTTPS). If you have an SSL certificate, choose HTTPS.
- Choose Domain: Select the domain where you want to install WordPress. If you have multiple domains, choose the appropriate one from the dropdown menu.
- In Directory: If you want to install WordPress in a subdirectory (e.g.,
example.com/blog), enter the desired directory name. Leave this field blank to install WordPress in the root directory. - Site Settings: Enter your site’s name and a brief description. These can be changed later from your WordPress dashboard.
- Admin Account: Create an admin username and password. Ensure they are secure to prevent unauthorized access. Enter your email address and choose a language for your WordPress installation.
Step 6: Advanced Options (Optional)
- Database Settings: You can choose to create a new database or use an existing one. Softaculous handles database creation automatically when installing WordPress with Softaculous.
- Backup Options: Configure backup settings if you want automatic backups. This is optional but recommended when installing WordPress.
Step 7: Install WordPress
- Review your settings to ensure everything is correct.
- Click the “Install” button to complete the WordPress installation process.
Step 8: Access Your New WordPress Site
- Once the installation is complete, you’ll receive a confirmation message with links to your WordPress admin dashboard and your new site.
- Click the admin link to log in to your WordPress dashboard using the admin credentials you created.
Post-Installation Tips
- Update WordPress: After installing WordPress with Softaculous, check for any updates to WordPress, themes, or plugins and apply them as needed.
- Install a Theme: Choose and install a theme that suits your site’s purpose.
- Add Plugins: Enhance your site’s functionality with essential plugins.
- Configure Settings: Set up your site’s permalinks, media settings, and general preferences in the WordPress dashboard.
Conclusion
Installing WordPress with Softaculous is a quick and efficient way to get your site up and running. By following this guide, you’ll have WordPress installed in just a few clicks, allowing you to focus on creating content and building your online presence. If you encounter any issues during the installation, refer to the Softaculous documentation or contact your hosting provider for support.
Got any questions? Contact us we are ready and happy to help!


