


Fusion Arc Hosting includes free SSL certificates with eligible cPanel Web Hosting and Reseller Hosting accounts. SSL certificates enable HTTPS, helping encrypt information exchanged between your website and its visitors.
This guide explains how to install a free SSL certificate directly from cPanel.
Estimated time: 2–5 minutes
Cost: Free
Requirement: Your domain must point to your Fusion Arc Hosting server ip.
Video Tutorial
Use the attached video to follow the full SSL installation process inside cPanel.
This video shows how to select your domain, issue the included SSL certificate, and confirm that the certificate was installed successfully in cPanel.
Step 1: Open the SSL/TLS Certificates Tool
- Sign in to your Fusion Arc Hosting cPanel account.
- Locate the search bar in the upper-right corner.
- Enter: SSL certificates
- Select SSL/TLS Certificates from the search results.
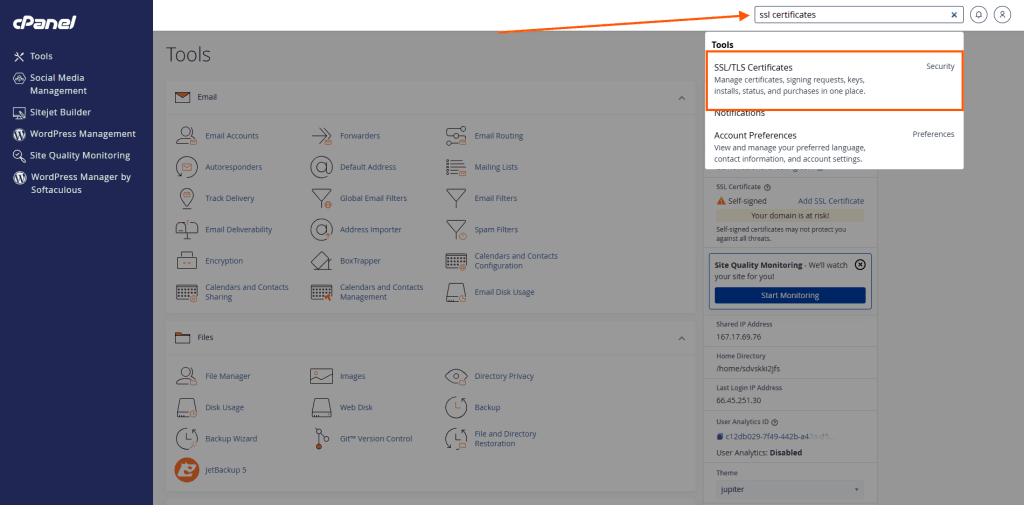
Search for “SSL certificates” and select SSL/TLS Certificates.
Step 2: Select the Domain You Want to Secure
The SSL/TLS Certificates page will display the domains and subdomains associated with your cPanel account.
- Locate the domain you want to protect.
- Select the checkbox next to the domain.
- Select both the main domain and its
wwwversion when available.
For example:
example.com
www.example.com
You may also see service subdomains such as:
mail.example.com
webmail.example.com
cpanel.example.com
Only select domain names that currently point to your Fusion Arc Hosting server. Certificate validation may fail for domains or subdomains that point to another provider or have no registration.
- Click Continue.
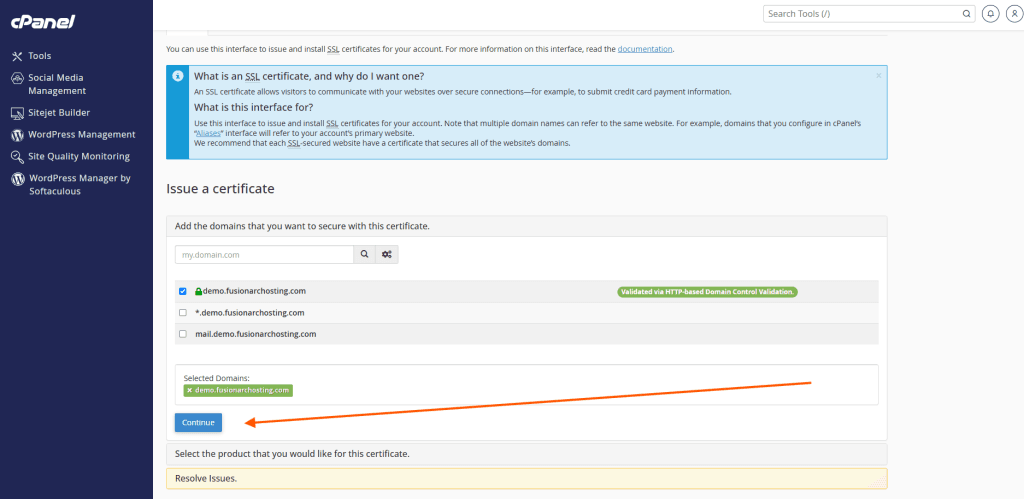
Select the domain names you want the SSL certificate to protect.
Step 3: Choose the Free SSL Certificate
After selecting your domain, cPanel will ask which certificate option you want to use.
- Select the available free certificate option.
- Confirm that the correct domain names are listed.
- Click Continue, Issue, or the equivalent confirmation button shown in cPanel.
The certificate is included at no additional cost with eligible Fusion Arc Hosting services.
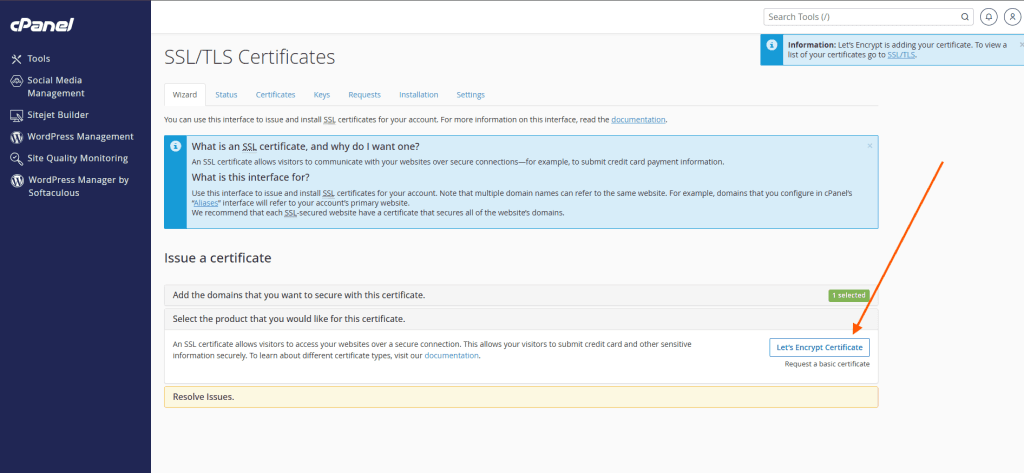
Select the free SSL certificate option and continue.
Step 4: Wait for cPanel to Issue the Certificate
cPanel will now validate the selected domain names and install the certificate.
During this process, cPanel may display a message such as:
- Adding certificate
- Issuing certificate
- Installing certificate
- Validating domain
Do not close the page until the process finishes.
The installation normally completes within a few moments.
Step 5: Confirm the Certificate Was Installed
When the installation finishes, cPanel should display a success message.
- Review the confirmation message.
- Locate your domain in the certificate list.
- Confirm that the certificate status shows as active or valid.
- Confirm that both the main domain and the
wwwversion are protected, when applicable.
Step 6: Test Your Website Using HTTPS
Open a new browser tab and visit your website using HTTPS:
https://yourdomain.comReplace yourdomain.com with your actual domain name.
Also test the www version:
https://www.yourdomain.comConfirm that:
- The website loads successfully
- The address begins with
https:// - The browser displays a secure connection or padlock icon
- No certificate warning appears
Automatic SSL Renewal
SSL certificates provided through AutoSSL normally renew automatically before they expire.
Your domain must continue pointing to the Fusion Arc Hosting server for automatic renewal to work correctly.
You normally do not need to repeat these steps unless:
- The domain was recently added to cPanel
- DNS records were recently changed
- The previous certificate failed validation
- The domain was excluded from AutoSSL
- You need the certificate issued immediately
Optional: Run AutoSSL Manually
Some cPanel accounts may include an option to manually run AutoSSL.
- Sign in to cPanel.
- Search for: SSL/TLS Status
- Open SSL/TLS Status.
- Select the domains you want included.
- Click Run AutoSSL.
This instructs cPanel to immediately check the selected domains and attempt to issue or renew their certificates.
Depending on the cPanel version, these controls may appear inside the main SSL/TLS Certificates interface.
Troubleshooting
The Certificate Cannot Be Issued
Confirm that:
- The domain is registered and active
- The domain is added to your cPanel account
- The domain points to your Fusion Arc Hosting server
- The DNS records are correct
- DNS changes have completed propagation
- A proxy, firewall, or external DNS configuration is not blocking validation
If you recently changed your nameservers or DNS records, allow time for those changes to update before trying again.
The Main Domain Works, but the WWW Version Does Not
Confirm that a DNS record exists for www.
The www record should normally be configured as either:
- A CNAME record pointing to the main domain
- An A record pointing to the hosting server IP address
After correcting the DNS record, run AutoSSL again.
A Mail or Webmail Subdomain Fails
A hostname such as mail.example.com can only be included if its DNS record points to the Fusion Arc Hosting server.
If your email service is hosted by another provider, such as Microsoft 365 or Google Workspace, the related mail hostname may point somewhere else and should not be selected.
The Certificate Is Installed, but the Website Still Shows “Not Secure”
This usually means the website is loading some content through insecure http:// addresses. This is known as mixed content.
For WordPress websites:
- Sign in to the WordPress dashboard.
- Open Settings and then General.
- Confirm that both the WordPress Address and Site Address begin with
https://. - Clear any WordPress caching plugins.
- Clear the LiteSpeed cache.
- Clear your browser cache.
- Update any old website links that still use
http://.